
Racing drones and FPV (First Person View) drones are increasingly popular among flight enthusiasts. For these pilots, having complete control over their video system is crucial. SmartAudio is a technology that allows you to adjust the video transmitter (VTX) settings directly from the On-Screen Display (OSD). This detailed guide explains how to set up SmartAudio to control the VTX from the OSD.
FPV VTX: Get to Know the Installation and Settings of VTX Smart Audio
The FPV VTX (Video Transmitter) plays a crucial role in FPV drones, transmitting video signals from the drone’s camera to the goggles worn by the pilot. The power output on an FPV VTX can vary widely, offering levels such as 25mW, 200mW, 600mW, and even up to 1W. This variability allows pilots to adapt to different flight environments:
- Low power output (25mW) is ideal for indoor flights or short distances.
- Higher power output (200mW–1W) is necessary for outdoor flights or longer ranges to maintain a strong and stable video signal.
However, manually changing the VTX power output can be time-consuming and inconvenient, especially when transitioning between different flight locations.
The introduction of VTX Smart Audio revolutionizes this process by enabling pilots to adjust the power output directly through their flight controller or OSD (On-Screen Display). This eliminates the need for manual adjustments, saves time, and provides greater flexibility during FPV sessions.
To help readers to get a better understanding, here are steps on how to install the VTX Smart Audio and set the Betaflight and OSD.
What is VTX Smart Audio
Smart Audio is a communication protocol developed by TBS (Team BlackSheep) that allows pilots to configure VTX settings directly through the flight controller (FC) or On-Screen Display (OSD) system. This capability simplifies adjustments such as frequency, transmission power, and other key settings, eliminating the need for physical interaction with the VTX hardware.
Advantages of VTX Smart Audio
- Remote Settings: With VTX Smart Audio, pilots can remotely adjust frequency, transmission power, and other settings directly via the OSD. This eliminates the need to connect the VTX to a computer or smartphone, offering greater flexibility and convenience during FPV drone operation.
- Ease of Use: The intuitive interface simplifies the process of setting up an FPV VTX, making it accessible even for beginners entering the world of FPV drones.
- Time Efficiency: By reducing the reliance on manual setup, Smart Audio saves valuable time. Pilots can make adjustments seamlessly through OSD controls, allowing for more flying and exploration time rather than spending excessive time configuring the VTX manually.
How to Install VTX Smart Audio on FC
Before you begin the installation, ensure that your FPV VTX supports the Smart Audio feature. This is crucial, as a VTX without Smart Audio compatibility will not be able to connect to a FC or OSD for remote adjustments. Before starting, make sure you have the necessary hardware and software:
- An FPV drone with a SmartAudio-compatible VTX.
- A flight controller that supports Betaflight or another compatible firmware.
- A computer with Betaflight Configurator installed.
- A USB cable to connect the flight controller to the computer.
Step-by-Step Installation Guide
- Step 1 – Connect the Smart Audio Control Cable
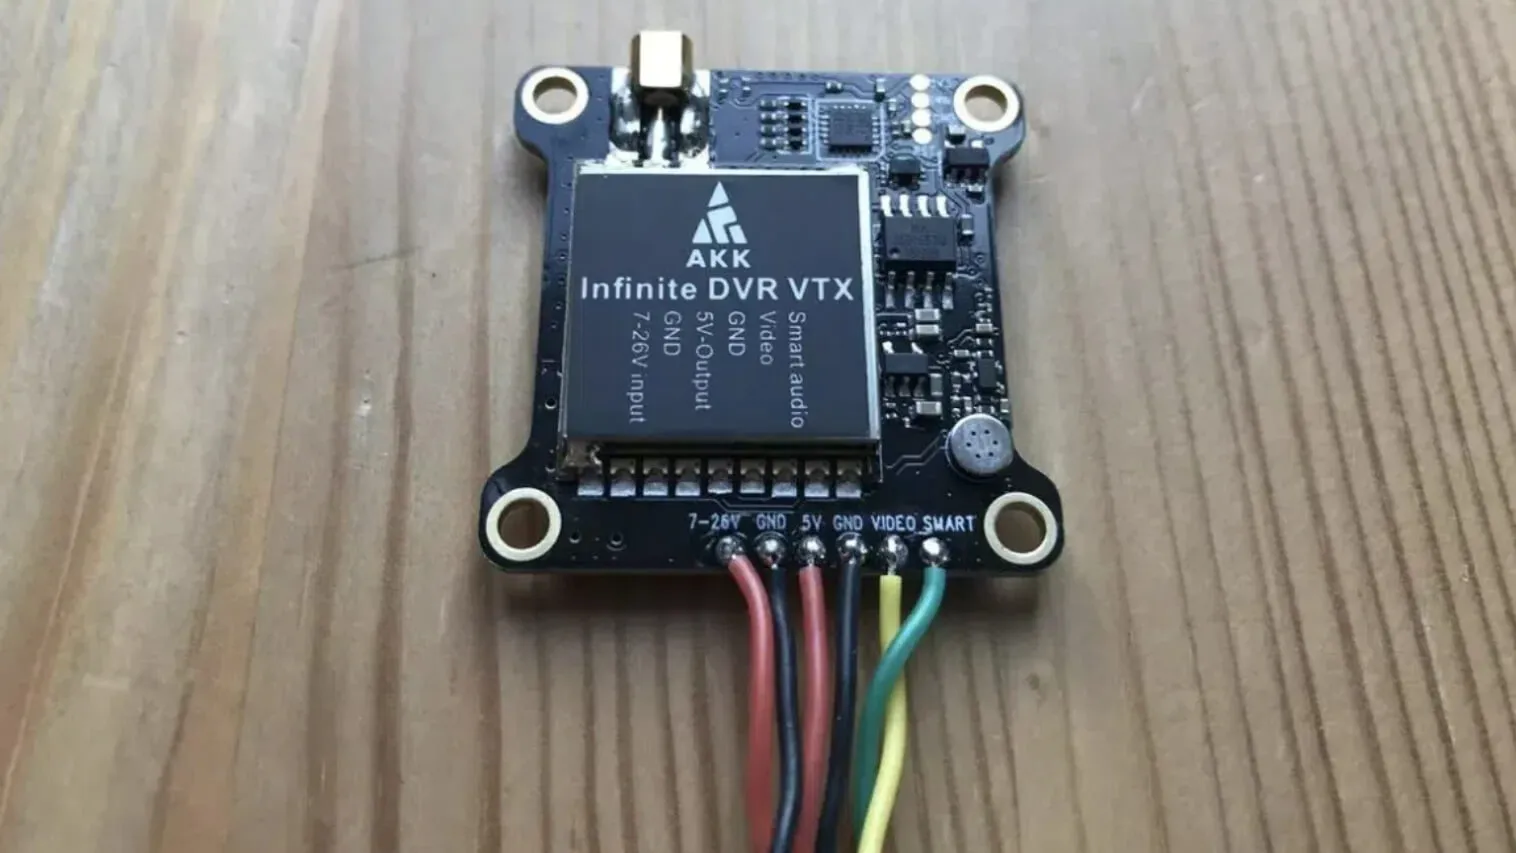
The first step is to connect the Smart Audio control cable from the FPV VTX to the FC or OSD. Typically, this cable is included with your VTX and will feature a connector that fits the Smart Audio port. If your VTX does not come with the cable, you may need to solder the connection between the VTX and the FC. The following is an example of the connection.
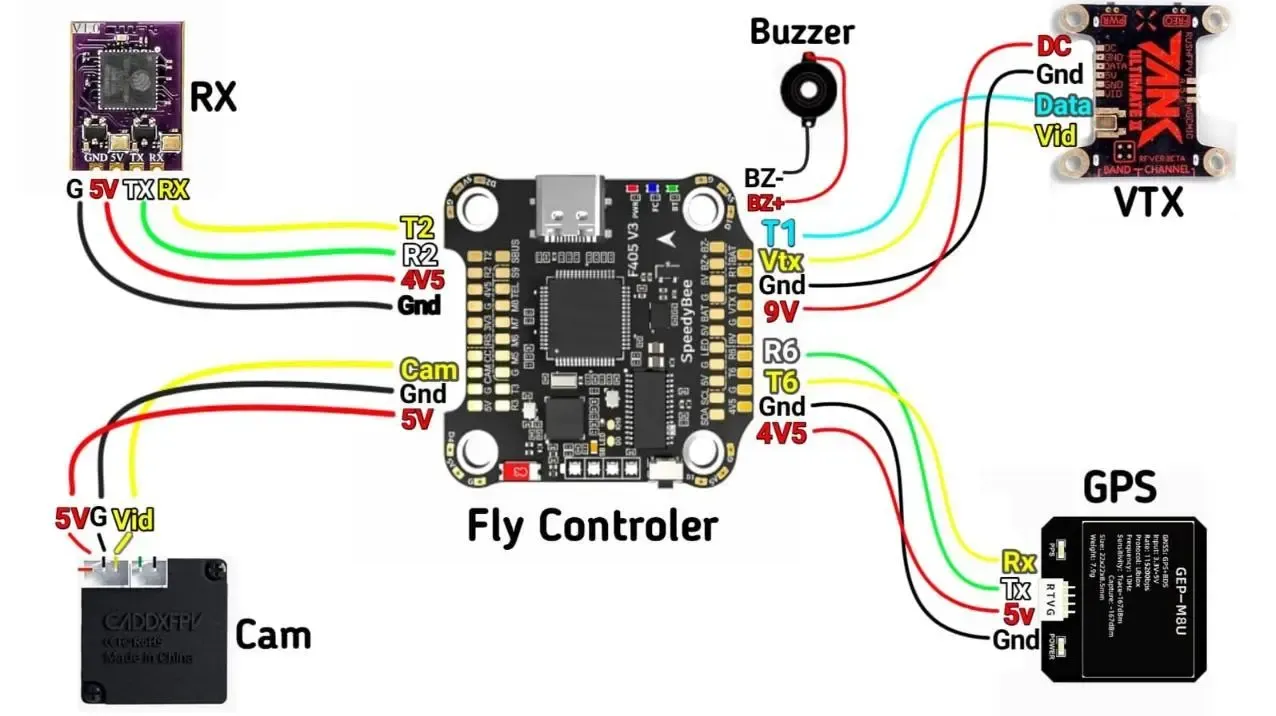
- Step 2 – Provide Power and Video Signals
Once the Smart Audio control cable is connected, provide a 9V power supply to the FPV VTX. Then, connect the video output cable (usually a yellow cable) from the FC to the VTX. This allows the video signal to pass from the FC to the VTX for transmission.
- Step 3 – Connect Smart Audio Data Cable
Next, connect the Smart Audio data cable to Telemetry One (T1) or another available UART port on the FC. This ensures proper data transmission between the FPV VTX and the FC, enabling remote configuration via Smart Audio.
- Betaflight Configuration
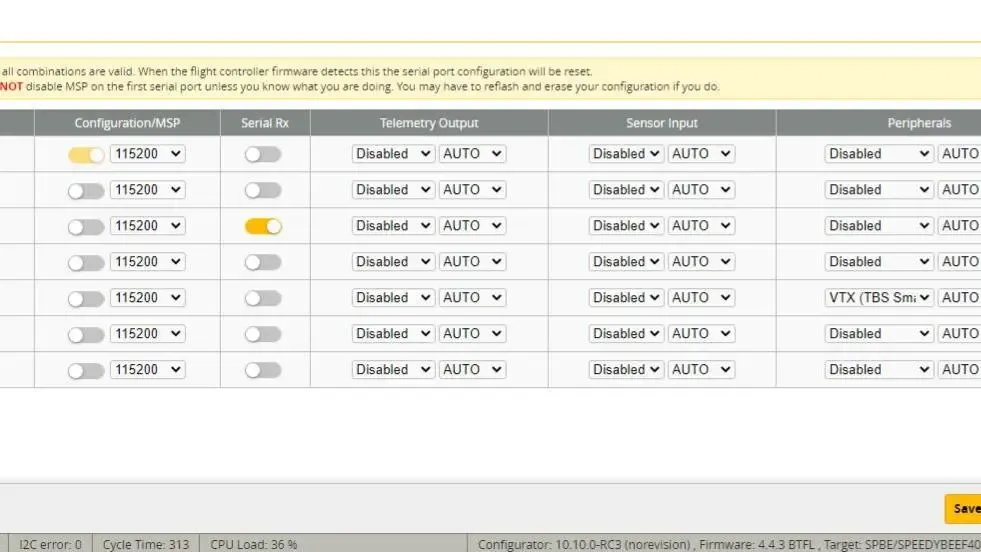
After the power cable and Smart Audio control cable are connected, you need to set the Uart configuration on the port on Betaflight to match. This ensures that the FC can communicate with the VTX via Smart Audio.
Setting Uart VTX in Betaflight
Open Betaflight Configurator on your computer then go to the ‘Ports’ or ‘Peripherals’ tab. Select the Uart that matches the pin used when you are soldering. Usually FC consists of 3 Uarts to 6 Uarts or even more and most people place the VTX connection on Uart 3 or Uart 4 according to the diagram in the manual book given when purchasing the FC.
Make sure the soldering path is correct and the Uart used is appropriate. The next step is to activate the Smart Audio option on Uart 4 by clicking the box that says disabled, change it to VTX (SmartAudio), and make sure to save the settings you have changed.
After the steps above are completed, you have successfully installed VTX Smart Audio and performed basic configuration to connect it to your control device. The next step is to make further settings via the VTX table.
Optimizing FPV VTX Settings with VTX Tables for Better Video Quality and Range
VTX Tables in the CLI settings of FPV drones play a crucial role in configuring parameters for video transmission through the FPV VTX (Video Transmitter). These tables allow users to adjust various settings related to video transmission, such as transmission power and frequency, to achieve optimal video quality. This customization helps meet the specific needs of different FPV flight environments.
By utilizing VTX Tables, pilots can easily optimize their FPV VTX settings based on external factors such as environmental conditions, flight distances, and personal preferences. This ability to fine-tune the FPV VTX parameters enhances the overall FPV flight experience, ensuring better video signal stability and range.
VTX Tables Settings
Open Betaflight Configurator on the computer then look for the ‘Video Transmitter’ tab. After you enter the Video Transmitter tab, the display is still blank without any Frequency settings or VTX power output. You need to enter the VTX Table so that on the Video Transmitter tab you can set Frequency changes or Power Output settings.
For VTX Smart Audio to function, you need to enter the VTX Table data according to the type of VTX used, so you can use various frequencies and select the required power output.
Where Can You Get a VTX Table That Matches the Type of VTX Used?
The first is that you can get a VTX Table from the shop description when you buy it online. The second is via Github which provides many types of VTX Tables from various brands.
Here I will set up the VTX Table which is often and commonly done by pilots when installing VTX Smart Audio for the first time, namely by retrieving data from Github.
Your first step is to open a browser and type in the search ‘VTX Table Github’(Link: VTX Tables)
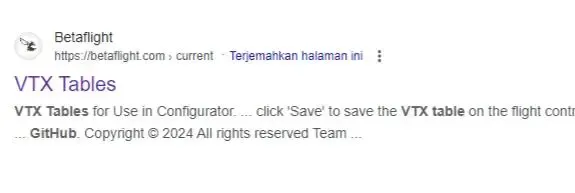
Once it appears, click VTX Tables as shown in the image to download the file:
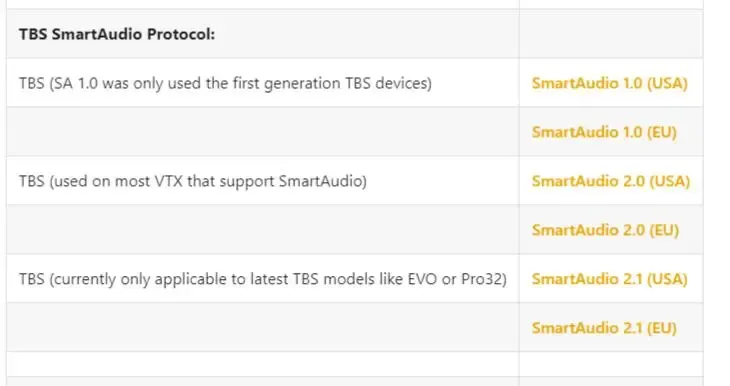
Here you can choose files according to your needs, whether you will use IRC Tramps or SmartAudio. What I will give as an example is using SmartAudio 2.0(USA):
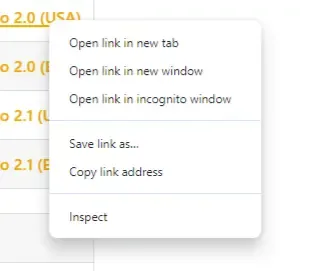
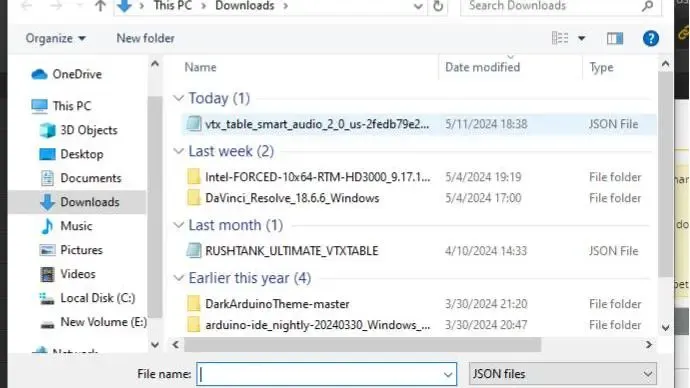
Download SmartAudio 2.0(USA) by right clicking on the mouse control on your computer and ‘Save link as…’
After that, open the Betaflight software on your computer and connect it to the FPV drone, then go to the ‘Video Transmitter’ tab then click ‘Load from file’
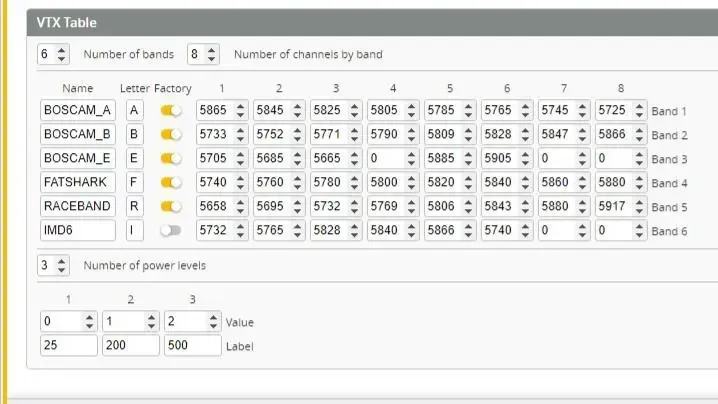
Enter data by clicking on the downloaded file, then click open. Automatically the Frequency table on the Video transmitter will be filled in as shown in the following image.
Or use the second method by entering data via CLI by copying the data that I have included below:
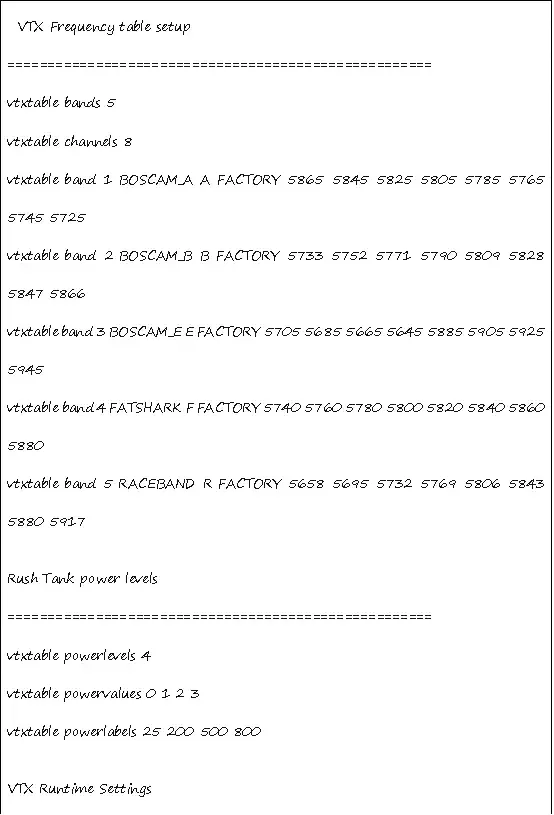
Then go to CLI (Command Line Interface). You can paste and click ‘enter’. Betaflight will automatically reboot and the frequency table on the video transmitter will be available.

Once on the Video Transmitter tab the VTX Frequency and Output power data appears, the next step is to adjust the Power Levels Number according to the VTX Power used, then set which channels to use and how many milliWatts of power output to use.
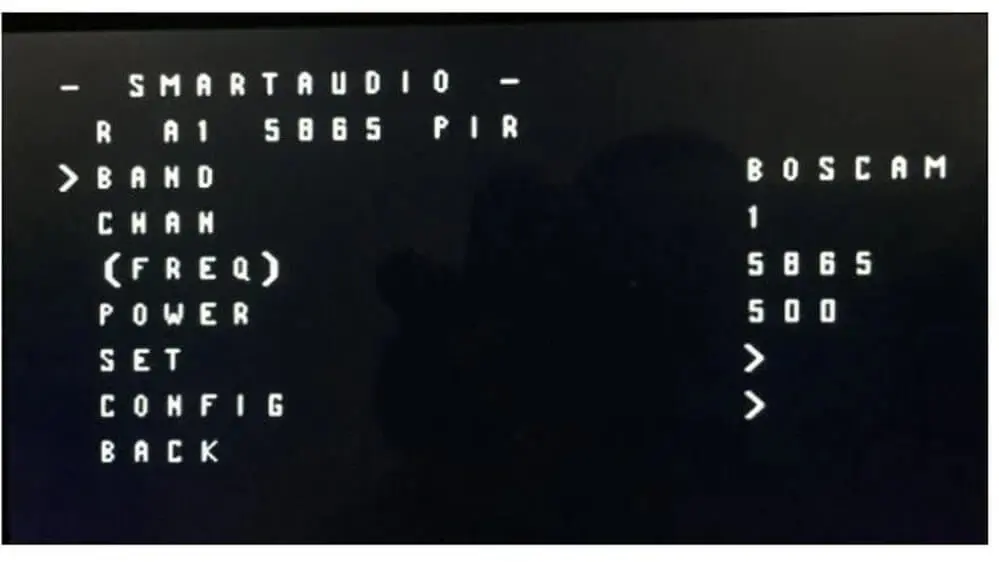
Here’s how to set Band, Channel and Power:
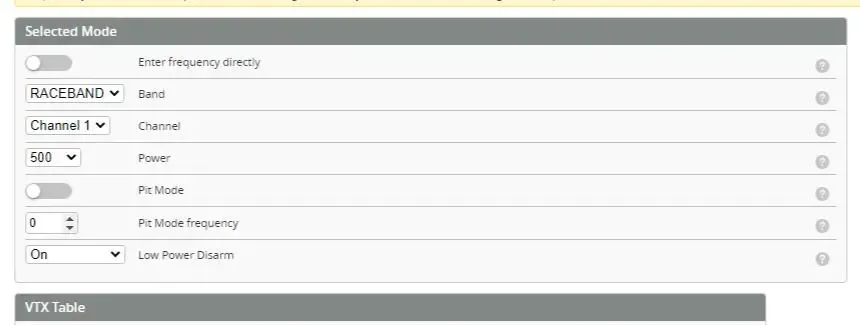
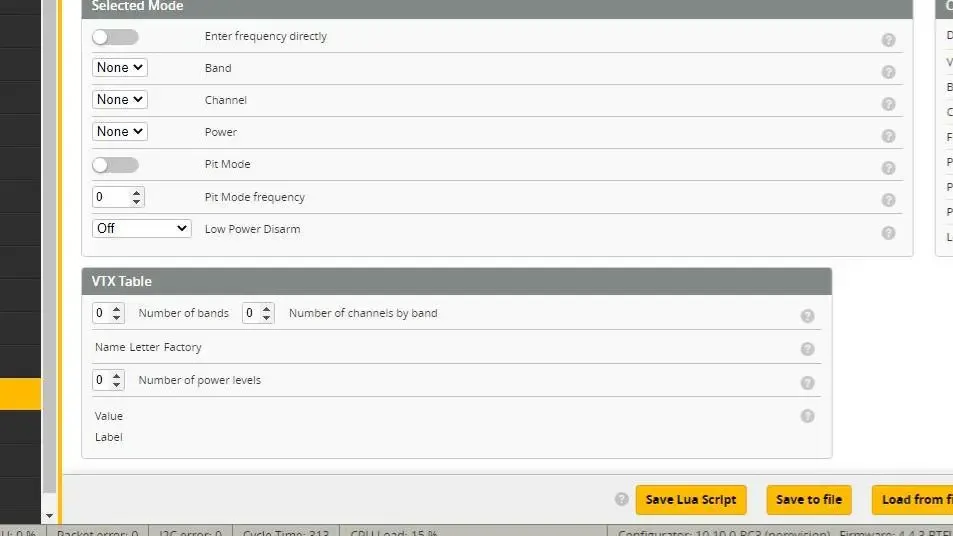
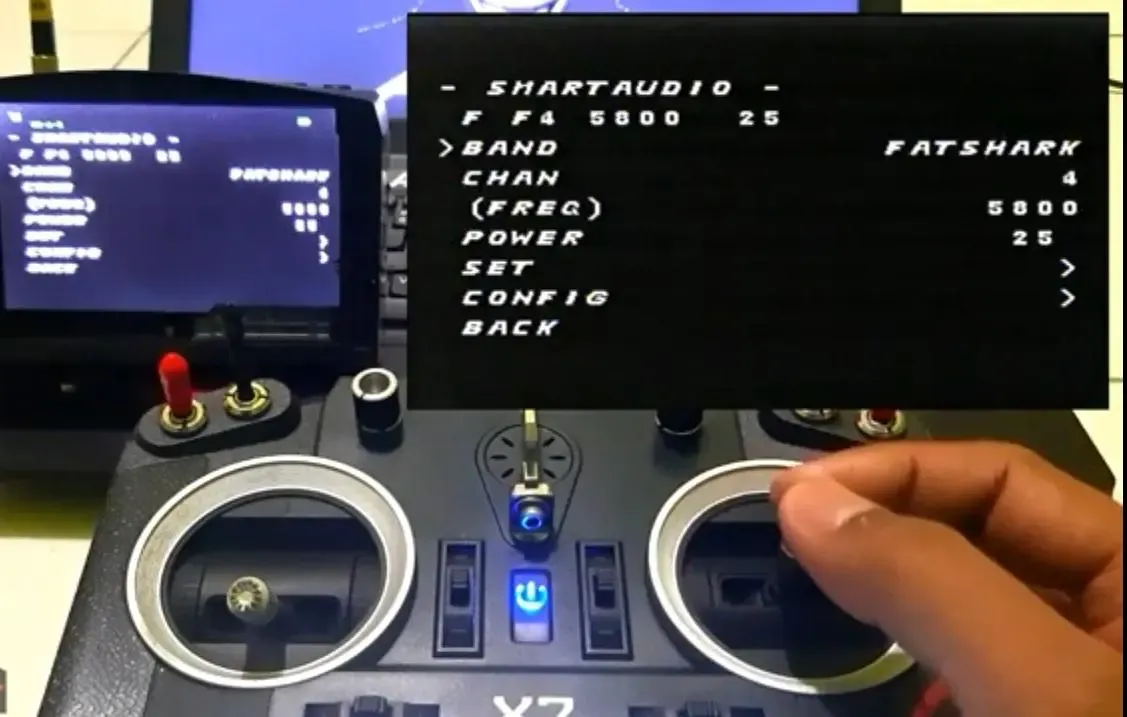
Before you proceed with the settings, you must first familiarize yourself with the parts and functions of the menu in the ‘Selected Mode’.
As we can see, there is a ‘Band’ here, which when clicked will display options such as ‘BOSCAM_A’, ‘BOSCAM_B’, ‘BOSCAM_E’, ‘FATSHARK’, and ‘RACEBAND’.
When you click on ‘Channel’, options from ‘Channel 1’ to ‘Channel 8’ will appear.
Each VTX has different power outputs. When you click on the ‘Power’ section, options like 25, 200, 500, 800 usually appear.
After understanding these, you can select the channel as needed. For example, if the VTX being used will be set to R3, then in the ‘Selected Mode’, change the ‘Band’ to ‘RACEBAND’ and the ‘Channel’ to ‘Channel 3’, or if the VTX is to be set to F7, simply change the settings to ‘FATSHARK Channel 7’.
For the power section, you also need to adjust it according to your needs. For example, to 200mW. If ‘Low Power Disarm’ is needed, just set it to ‘on’. ‘Low Power Disarm’ is responsible for setting the VTX output power to the lowest position when the drone is not armed. Usually, the VTX is at 25mW and when armed it will increase to 200mW if you set it to 200mW.
The advantage of enabling ‘Low Power Disarm’ is that the VTX does not overheat quickly when the drone is powered on, but the disadvantage is that when you fly the drone with a fairly long range and then crash and disarm, the goggles’ view to the drone will be disconnected because the VTX output power returns to 25mW, which is not enough to connect the range between the drone and the goggles.
Adjusts the Center Frequency Value on the Antenna
Why is There So Much Frequency Data in the VTX Table?
Frequency options in the FPV VTX (Video Transmitter) table are usually provided in various choices to accommodate different types of equipment and environmental conditions. Additionally, the purpose is to provide flexibility to users to adjust the frequency that best suits their equipment and to avoid frequency clashes with other devices in the vicinity when flying FPV drones simultaneously, such as during racing. With so many frequency options, users can find less congested channels for their video transmission, thereby improving signal quality and their flight experience.
It’s important to choose a frequency that matches the midpoint value of the antenna to maximize its performance. Antennas have optimal performance at certain frequencies, usually referred to as ‘resonance’. Choosing a frequency that matches the midpoint value of the antenna will enhance signal transmission efficiency and reception quality, optimizing the range and stability of video signals on FPV devices .
There are many types of antennas for FPV VTX, and different types of antennas also have differences in their frequencies. Here’s how to determine the midpoint value of the antenna to match the frequency value between the antenna used and the VTX.
| Rush FPV Cherry 5.8GHz Ultra ExtendedBand Width: 5600-6000MHzThe Rush Cherry antenna type has a frequency value of 5600 – 6000MHz. To determine it, add 5600 + 6000 = 11600 then divide the result by two, which is around 5800, and check the VTX table for the corresponding value, which is Channel F4. |
| 5.8G Lollipop 3 Long version AntennaCenter frequency: 5750MHzFor the Lollipop antenna, the center frequency value is already provided. We need to look at the table to find the same or close value, which is close to frequency B2, i.e., 5752. |
| Lumenier AXII 2 Long Range Right-AngleBandwidth: 5.3GHz-6.2GHzFor this type of antenna, the process is the same; add its values and divide by two. The result is 5.3 + 6.2 = 5.72. The corresponding or close frequency value in the table is Band B2. |
Optimizing FPV VTX Settings via OSD for Better Video Quality and Range
To begin setting up the OSD, first, turn on the transmitter, then power up your FPV drone by connecting the battery and wait until it connects. After that, turn on the goggles for monitoring while setting up via OSD. To access the setting options, you need to perform a joystick combination on the transmitter. Move the right stick upwards and push the left stick to the left, as shown in the following diagram:
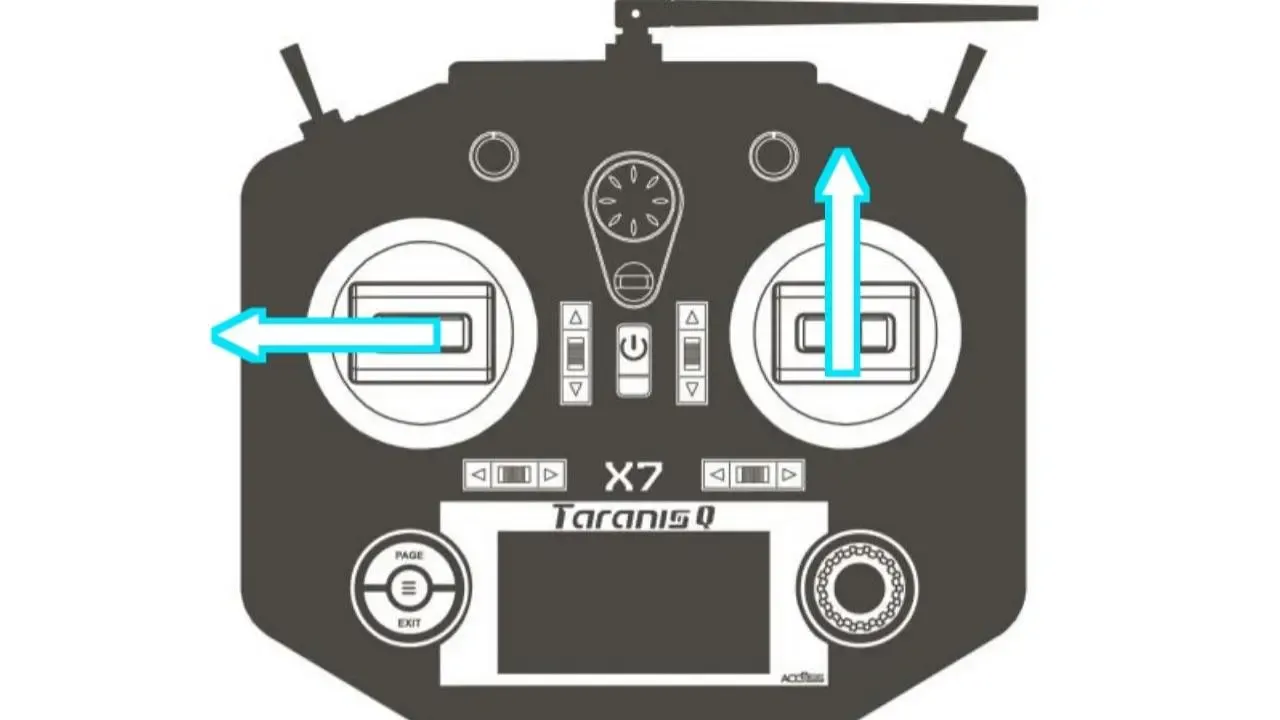
By moving the joystick simultaneously, the Settings display in the OSD will appear.
Understanding the Joystick Functions for Control
Once the setting options appear on the goggles display, the next step is to understand how the joystick works in navigating the OSD settings. So, the joystick on the right is used to navigate the menu settings on the OSD.
There are two functions on the right joystick:
- When you move the joystick upwards, the pointer arrow will move upwards;
- When you move it downwards, the pointer will move downwards. Moving it to the right selects the menu item.
On the other hand, the function of the joystick on the left is to quickly save by moving the joystick to the right and selecting ‘save’. To return to the previous menu, move it to the left.
Power Output Setting using OSD
Once you understand the function of the joystick, go to the OSD menu and look for the Features option:
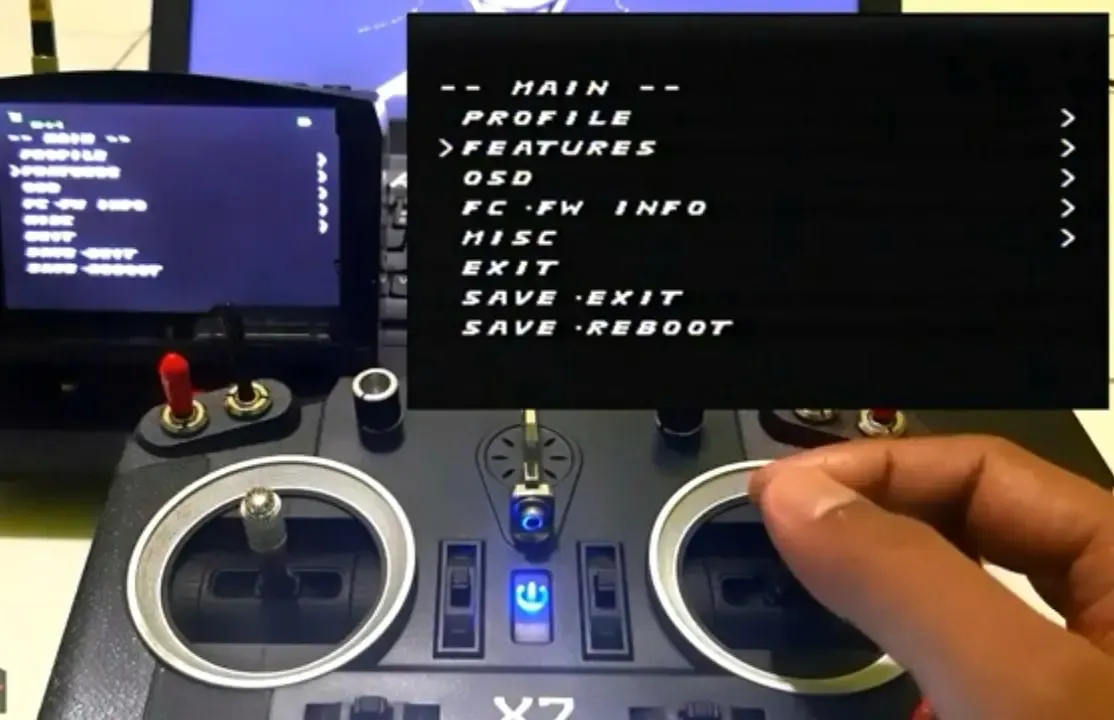
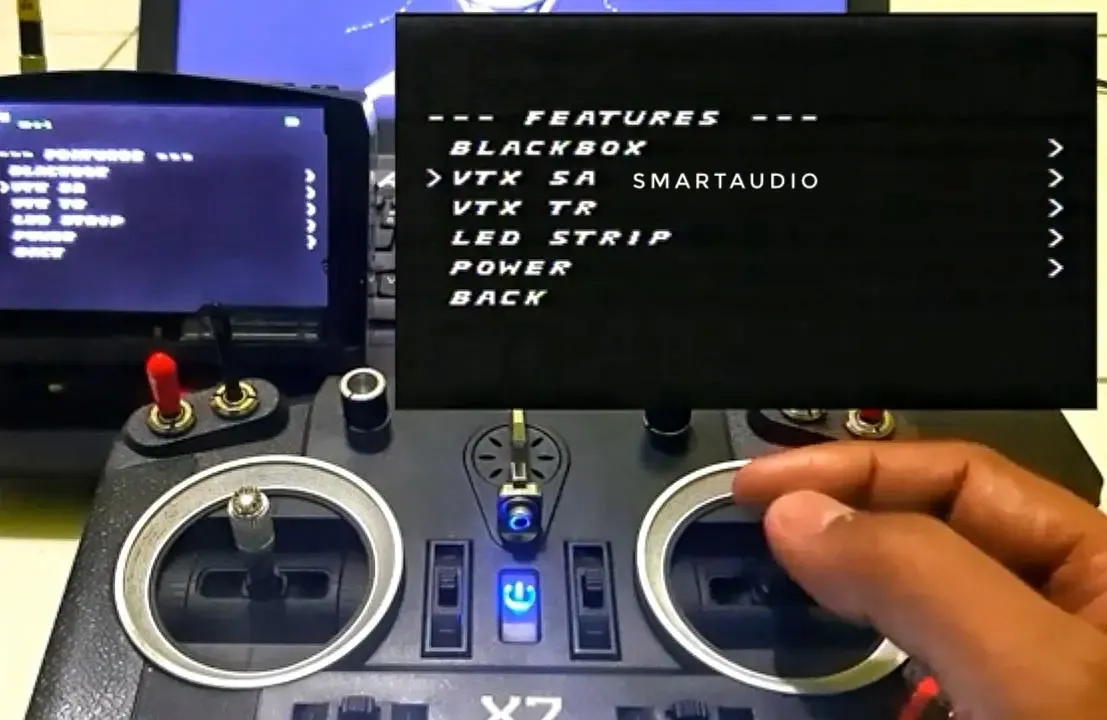
Ensure that the VTX configuration options are enabled. This often includes items like “VTX Channel”, “VTX Power”, and “VTX Band”.
Select VTX next, you can adjust the power on the VTX and also change the Band and Channel. If you want to change the VTX power, select the Power menu using the joystick, then move the joystick to the right to increase the mW and to the left to decrease the mW on the VTX. For example, 25mW, 200mW, 500mW, or 800mW. The same goes for changing the Band or Channel.
After you’ve selected the transmission power as needed, make sure to always save those changes by moving the joystick downwards until you find the ‘back’ option, then look for the ‘save’ option to store the settings, or move the left joystick to the right for a quicker save.
Once you’ve saved the settings, ensure to always check that the VTX power settings have changed according to your specifications. This can be done by checking the OSD display to see if the selected transmission power has changed or not. If it hasn’t changed, it could mean that the power output hasn’t been successfully saved, and you may need to redo the settings if necessary.
Using SmartAudio in Flight
Once everything is set up, you can start using SmartAudio to control your VTX from the OSD.
Accessing VTX Settings
- Enter the OSD menu: Use your radio controller to access the OSD menu. This is usually done by moving the control sticks to a certain position (such as holding the left stick to the center and the right stick to the left).
- Navigate to the VTX menu: Once in the OSD menu, use the sticks to navigate to the VTX configuration option.
- Change the settings: You can now change the VTX band, channel, and transmission power directly from the OSD menu. The changes take effect immediately, which is very convenient for adjusting settings during flight.
Tips for Optimal Use
- Follow regulations: Make sure to comply with local laws regarding allowed transmission power levels.
- Avoid interference: Change channels if you encounter interference with other pilots or signal sources.
- Optimize transmission power: Use the minimum necessary transmission power to achieve good signal quality. Higher power consumes more battery and can generate more heat.
- Regularly check connections: Periodically inspect all connections to ensure that wires and solder joints are secure. Loose connections can lead to signal dropouts and intermittent issues.
- Use quality components: Invest in high-quality VTX, antennas, and other related components. High-quality parts can significantly improve the reliability and performance of your video transmission system.
Troubleshooting Common Issues
Despite careful setup, problems can arise. Here are some tips to resolve them:
No Communication with the VTX
- Check connections: Ensure all wires are properly soldered and connections are not loose.
- Check UART settings: Make sure the correct UART port is configured for SmartAudio in Betaflight Configurator.
- Update firmware: Check if your VTX and flight controller have available firmware updates and apply them if necessary.
OSD Doesn’t Show VTX Options
- Check OSD configuration: Ensure VTX options are enabled in the OSD tab of Betaflight Configurator.
- Check video connections: Ensure the VTX video wire is correctly connected to the flight controller.
Video Signal Issue
- Change channel or band: If you encounter interference, try changing the VTX channel or band.
- Check the antenna: Ensure the VTX antenna is properly attached and in good condition.
Conclusion
Setting up SmartAudio for VTX control from the OSD is an essential skill for any FPV drone pilot. After following this guide, you will now be able to configure your system to gain complete control over your video settings, enhancing your flight experience and race performance. With proper setup, you can quickly adjust settings based on conditions, which is a significant advantage in the competitive world of FPV. Moreover, being able to make real-time adjustments to your VTX settings directly from the OSD can save you precious time and effort, especially during races or when flying in different environments. This flexibility allows you to optimize your video transmission for the best possible quality and minimal interference.
Additionally, understanding and mastering this technology will not only improve your piloting skills but also give you an edge over competitors who may still rely on manual adjustments. Embracing these advanced features can lead to more efficient flights, better signal clarity, and an overall more enjoyable flying experience.